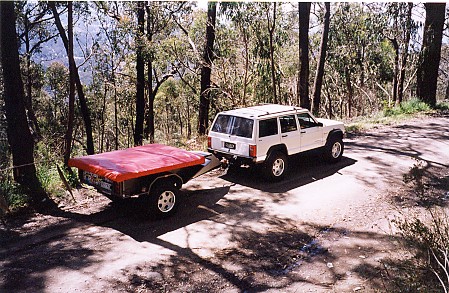
TRAILERS
Comfort has started to get more important as the years of travel has gone on with sleeping on a decent bed and being able to prepare food and sleep free of bugs the main priority. This is so we can enjoy the surrounds even more and wake up refreshed the next day. We don’t seek at all the toilet and shower block of a camp ground as we prefer the peace and quite of being remote and use a shovel and bag shower instead. So rather than overload the vehicle putting strain on suspension components etc and raising the centre of gravity using a rack and still be able to carry all the equipment, food and clothes etc. for being self sufficient in the Outback we need, we decided we would much rather tow a trailer for the one month a year when we are touring every year than put up with a larger 4wd the rest of the year. We chose to buy the small and lighter Cherokee and tow a trailer as the weight of the trailer fully loaded with food, water, fuel and clothes etc only brings up the total mass to that of a completely empty Landcruiser and Patrol of the time ( they are even heavier now ) but still with more power under the bonnet. It is also spread over 6 tyres which is an advantage over sand and soft ground where we spend a lot of time on and should we ever sink, we can simply un-hook the trailer and drive out with 700 kgs less weight to shift! Then snatch the trailer out and hook it back up. Try to lose that much weight that quickly in a Landcruiser! It has also made quick getaway’s so easy as everything it kept in the trailer ready to go and only have to add food, water and clothes and we are off. The car only has the fridge and battery to add in the back and we are set to go well under an hour.
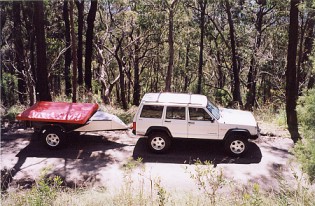
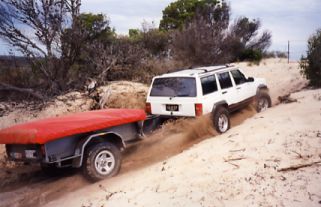
Off road trailers
In Australia it is very common to tow offroad trailers because of the vast distances that have to be covered between refueling and food restocking points. I have to carry 60 litres (16 gallons) of water and 50 litres (13 gallons) of fuel plus food and clothes and camping equipment for three. As soon as you leave the tar it pays to have at least two weeks worth of food and water in case of break down or rain which can raise rivers in a few hours from dry to over a meter and half deep. You then have to sit it out until it drops enough to cross. The tracks I travel at the time of year that I do (early December), there maybe only a person coming past every two to three weeks. We have 813,769 kms of roads of which only 323,020 kms are sealed. 490,749 kms are unsealed of which 177,593 have no surface at all! Which means they just run a bulldozer through to mark the track and leave it at that! I average over 4,000 kms. (2500 miles) off pavement driving per trip that I do, so it pays to have good suspension. The standard suspension on trailers with the short hard leaf springs cause many failures in the springs and mounts through being too hard and fatiguing after a while. They also cause every thing to jump around inside and break. The first trailer that I built had independent suspension with 9" of travel from a rear end off a Subaru car. I used heavy duty shocks as well with good results and it rode nice and soft but it is not suitable for carrying over 500 kgs. (1100 lbs.). The new one I have uses XJ upcountry leaves and shocks which I carry around 750kgs. (1650 lbs.). The long leaves give a smooth ride and stop things from getting broken. Remember, if you wouldn't run the suspension on your tow vehicle, you shouldn't run it on your trailer! Best test is, if you cannot move the suspension by leaning down on it with all your weight at least an inch, it is too stiff! This would mean that the springs are at least more than 200lbs which is too much for a trailer weighing under a ton loaded. Both trailers also use an offroad coupling that allow 360 degrees of rotation so no binding can occur.
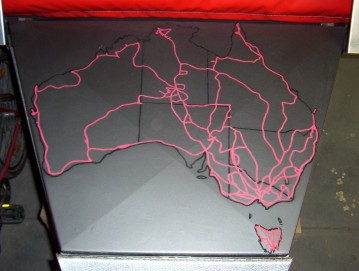
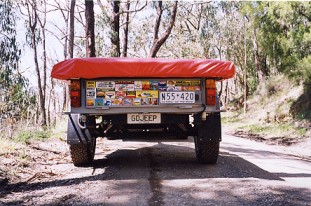
This is from the lid of my offroad trailer showing the places (in red) that I have driven in the last 8 years with my XJ and trailer in tow. Australia is similar in size to the United States of America so you can see how easy it is to rack up the miles. The other photo shows the souvenir stickers of the out of the way places I have collected along the way.
My XJ sprung trailer
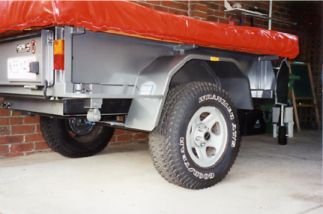
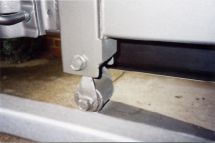
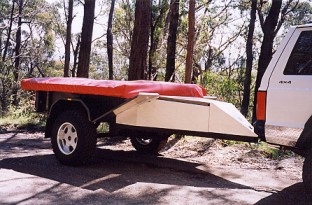
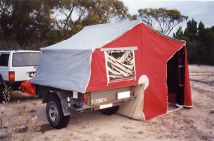
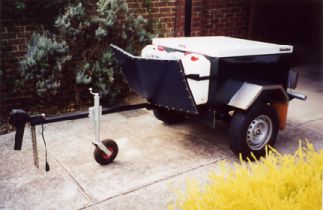
This is my latest trailer that uses XJ upcountry spring and shocks with a Rancho add-a-leaf that you can see getting fitted in the how to section. I have changed trailers because after the roll over I didn't what the weight of my roof top camper effecting the centre of gravity. It will also allow me to set up a base camp and not having to pack up everything when I need the car. The trailer did run 30x9.50x15 tyres on XJ Cherokee rims but now runs 245x75x16 BFG AT's on matching 16x8.5 rims with electric brakes. The axle is solid 2" square bar that has been turned on a lathe to the fit within the track of my XJ. The hubs have a Ford stud pattern which is the same as the XJ, which are made for trailers.
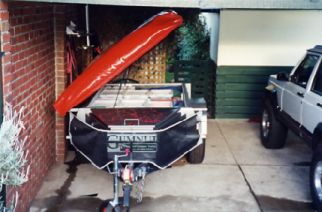
XJ springs, shocks and wheels. The camper pack tilts so you access the interior
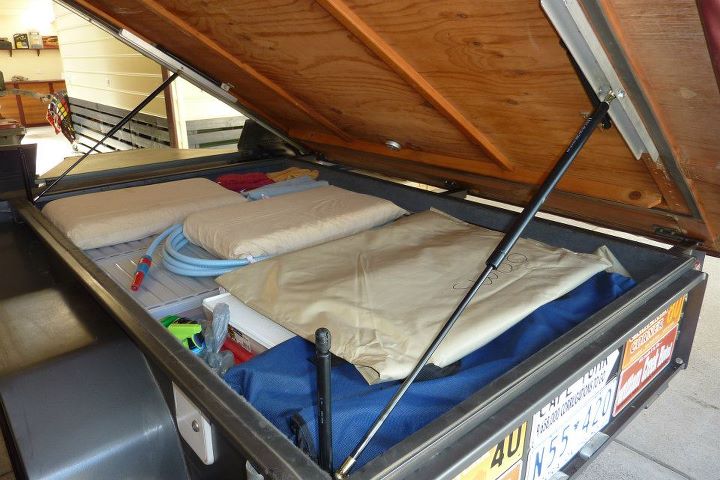
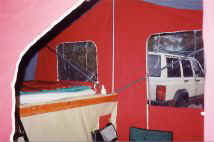
Front boot and stone shield Layout with everything set up
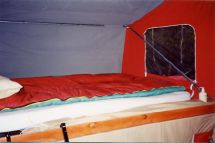
The front locker contains the fuel Jerry's, gas bottles and oils etc. The main section has the food, clothes, recovery gear (hand winch, straps, chain etc.) and the table and chairs. The queen size bed that is left made up ( you actually sleep on the trailer ) can also be tilted on gas struts to access the trailer from inside the tent. The stone screen around the front is made from shade cloth and is very strong but was not as successful as I hoped so was changed as you will see later on this page. Underneath is a 60 litre (16 gallon) water tank and a full sized spare which is lowered on an 'A' frame. There is also a hand water pump on the back of the guard as well as a tap a the back.
The spring mounts were made from square tube and braced.
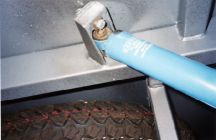
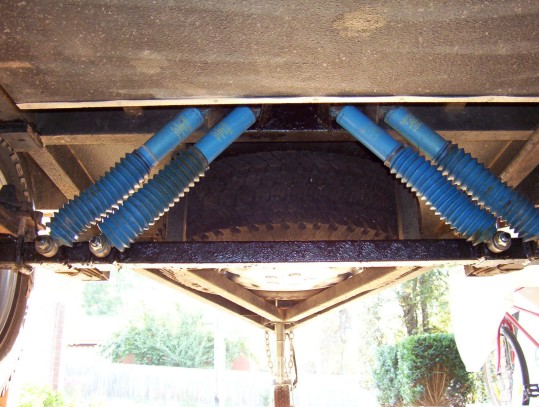
The Upcountry shocks are mounted with the top mount made from 2" tube with one side cut away and 1" tube welded inside across the ends. I have since added another set as I found the tyres had some cupping after 55,000 kms. For more information on building your own trailer I have now added plans that I have drawn up for you of the above one or see this site or here for parts and information. I would however use 75x50x3 mm RHS or box tube for drawbar and main chassis members if you intend using it offroad at all. The floor and walls are made from folded 2 mm sheet steel.
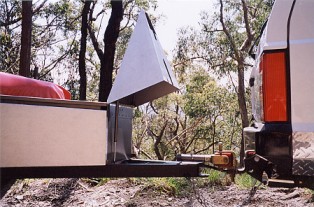
Stone deflectors and front cone added with the front clad in Stucco aluminium.
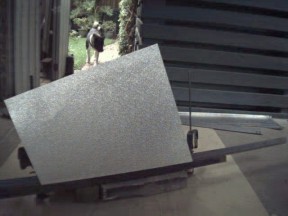
How alloy was folded using angle iron clamped each side and a rubber mallet to shape.
After the first major run through the Outback including crossing Australia from south to north I was getting stone chips in my XJ's rear bumper that were flicking off the jockey wheel clamp and the front of the trailer body where it extended wider than the main body. So what I did is remove that extension and folded up a stone deflector that angles up from the bottom of the guard to just forward of the camper pack to force the stones downward. The jockey clamp is mounted across between the front of the A frame with a plate welded in in front of it at a 45 degree angle. The whole front was then covered with a tapered cone that comes to a point behind the coupling and is lifted up on a gas strut to allow access to the jockey wheel when fitted and can be lower over it when it is down. The whole front was then clad in Stucco aluminium so no repainting has to be done. The whole under side has also been coated in a rubber and tar paint that seals and stops stone chipping. I have now done a trip with this setup and it worked very well in keeping all the stones off the back of the car with only two very small chips found after 5700 kms.
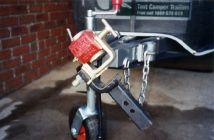
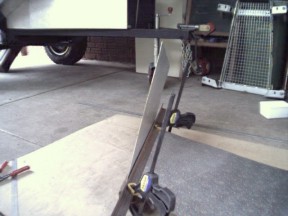
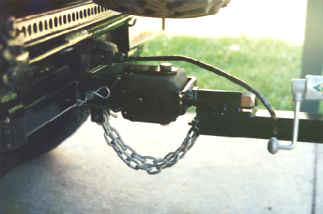
This a commercially available coupling that is made by Treg in South Australia. It is rated at 2270 kgs (5,000 lbs.). Shown here with my hitch tongue attached. The block is made from polyurethane. The coupling is released by pulling a retaining pin underneath and then pulling up on the 'T' handle leaving the 'U' section bolted to the tongue. It has a full 360* range where you could roll either the car or the trailer leaving the other one upright. Not a recommended test but my wife has tried it with my other one when the car got rolled (see specifications page). Full details on how to make your own are shown here. The only place I have seen them used in the States is here just recently. Also in the US look at this one.
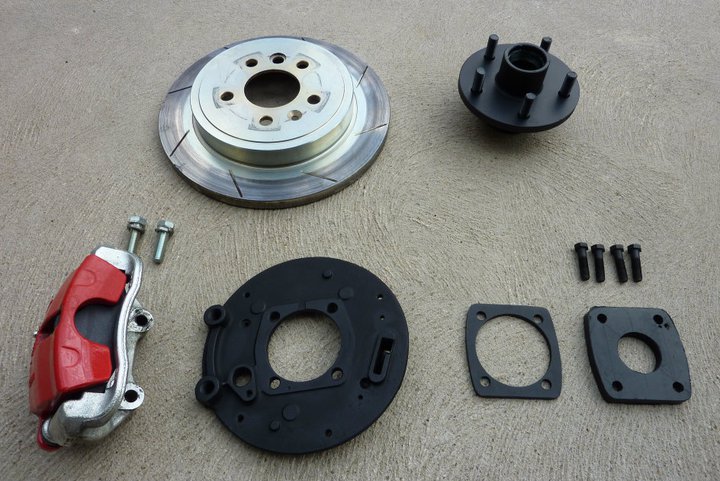
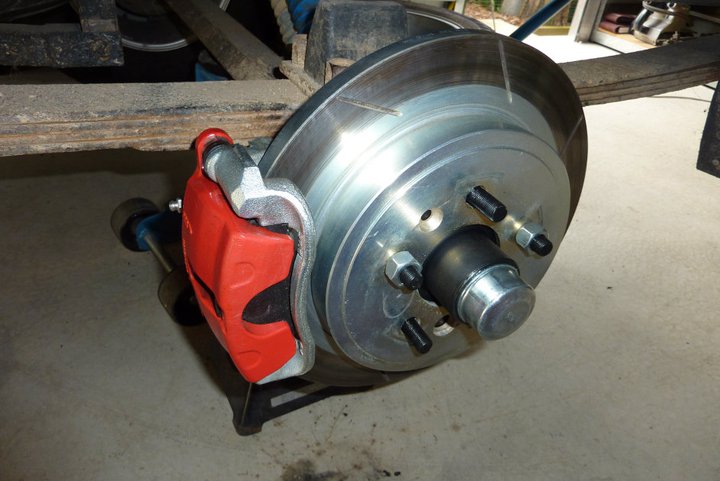
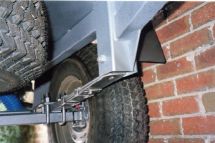
Recently I have removed the electric drum brakes and gone with a much more simple and effective disc brake conversion using parts from a BA Falcon Ute or wagon. You can see how I made the conversion up in this write up.
Gas Strut Boosters

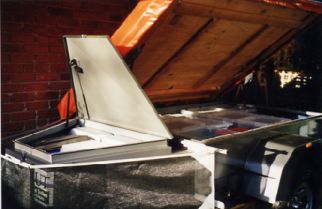
I have my offroad camper trailer setup so
the entire camper pack/lid can hinge up to make it easy to load it. Otherwise
you have to slide everything in through the tailgate which gets old quickly. It
weighs a total of 150kg/330 lbs including all the canvas tent, mattress,
bedding, awning off the side as well as a 240 watt solar panel I store on the
mattress for lots of protection while driving offroad. What I found that even
with high pressure ( 800N each in this case, (N) 10 Newtons = 1 kg so 80kg of
force each ) gas struts, it was quite hard for my wife to lift the initial 6-8".
After that it got easy and the gas struts would lift it the rest of the way. The
problem is the gas struts are dead level when fully closed so all the struts
force is only pushing sideways and not up. She was having to push up half the
lids weight at the very start, equalling 75kg/165lbs, but this reduced to
30kg/66 lb by 200mm/8". Dropping the lower ends of the gas struts would have
helped but also makes pulling the lid back down harder when fully up, that was
already at the limit she could pull down, and would also get in the way when
packing.
So I came up with this idea of struts that assist only for the very start of the
lift until the main struts are pushing enough weight to take over. These were
rated at 250N each which gives 50kg/110 lbs of up thrust as they are mounted
exactly vertical. So the start weight went from 75kg/165lbs down to only 15kg/33
lbs. By the time it runs out of travel the weight of the lid had dropped to
25kg/55lbs which was comfortable for her to lift.

The gas strut must always be mounted with the main body upwards so that the oil inside with the gas keeps the seals and guide from drying out where the shaft comes out of the body. Also gives some dampening at full extension when this way up. So I just used a PVC 20mm electrical conduit saddle to hold the gas strut in place as the body has to be able to slide up and down through it easily. The bottom of the gas strut is the only part that can be fixed in place. Mine look a little strange as I have screwed the ball fitting off and the end goes into the floor instead as these gas struts I had were too long with the bottom ball fitting mount still in place for the height of the sides of my trailer. They were just some I had lying around and were the right pressure it turned out so utilized them this way. Some thing I also first didn't take into account was that you have to balance the push down weight as well. First time she could lift it fine but then couldn't get it back down once resting on the vertical gas struts as not enough weight left in the camper top. The 25kg/55lb lid weight, with main gas strut assistance at this height, pushing against the 50kg/110lbs gas strut pressure ended up being the perfect balance as meant she only had to push down half, or 25kg/55lbs, of weight to close it. You also see above that I added a rub pad for the top of the gas strut to the underside of the lid to push against as it moves a bit due to the angle change of the camper pack.
Tent erection
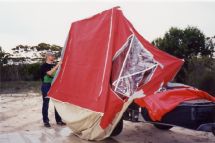
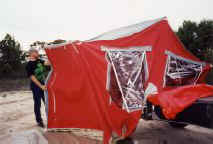
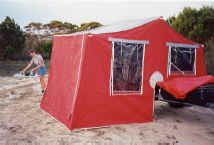
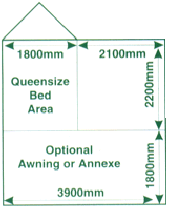
The tent setup is done in under 10 minutes with the canvas pulled over the side and then you peg out the floor with four pegs before a hoop inside is extended until the canvas is taut and you are done. The whole thing pivots on one side with three hoops holding everything up. You then have a nice queen sized bed already made up ready for sleeping as you leave the bedding in place when you fold it up. The large end wall can be opened right up and supported on two poles for extra shelter. There is also a awning that extends the full length of the side if even more space is required. The bed windows have canvas covers that can be closed from the inside for privacy. The bed area is 1.8 x 2.2 meters ( 6' x 7'2" ) and the sitting area 2.1 x 2.2 meters ( 6'10" x 7'2" ), which makes for a good living space that we spend around 2 months of every year in. The canvas was done by a company that no longer trades and I had them use 12 oz canvas to the roof while the walls use 10 oz. The roof in grey to help reflect the heat and the walls in dark red to hide the Outback dust. Also had it fitted with micro mesh fly screens to all windows and the door that keeps all the bugs at bay. Clear windows are also on all windows except for the large end wall. We went for a soft floor model over and flip over hard floor as it saved around 150 kgs in weight and gave you a far usable floor area.
I have now added the tent setup on video. These are
all in real time so you get an idea of how long it really takes. Only missing
the putting in of the first peg on the corner you cant see. Normally goes
quicker still as my wife would help me but someone had to hold the camera.
![]()
Now I get asked a lot if something like this is selling in the USA and now there is. An Australian camper manufacturer 3DogCamping now export to the USA as well. Also these sites for USA made ones; http://www.safaritrailers.com/ , http://www.haultent.com/ and Adventure Trailers which now use the same hitch even. For Australian camper trailers go to my links page for a listing.
The best brake controller for offroad use
I ran a good quality analogue one that use a pendulum to determine brake loading or the deceleration rate by the pendulum swinging further forward the more the force is and providing a higher voltage for the brakes. The problem is that when four wheel driving on steep tracks, the pendulum will already be swung forward when going down steep hills, you only have to just touch the brake lightly it will give full voltage to the brakes causing them to lock up. You can back off the controller but then you lose braking when it is flat again. If you have to stop while going up a steep hill you get no breaking from the trailer as the reverse happens. The digitals have their problems too. First these electric controllers don’t detect vehicle deceleration. Instead, they apply the preset voltage as long as the brake pedal is depressed. That means that you can’t apply intermediate braking power for gradual braking, which often leads to erratic braking during high-speed braking. Second, they wear the brakes more rapidly, overheat faster, fade sooner and can glaze for decreased efficiency. But I found a unit by Jordan brake controllers that has a very simple solution. It simply has a cable that attaches to your brake pedal arm that moves the resistance module inside the control unit to vary the voltage. So the harder you press on the pedal the more the cable is pulled and the more the voltage goes up. It has a digital read out next the adjustment knob so you can see at all times exactly how much voltage is going to your trailer brakes. No other adjustments are needed as it doe not have to be leveled. Since I first set the voltage I needed at maximum brakes without lockup, I have never had to touch this controller again. It is just brilliant. Only problem is for Australians is that they are made in the States so you have to get someone to send one over for you. The only other one I have heard is usable offroad in the Tekonsha Prodigy. Make sure it is a 2006 on at least as there were some faults with earlier versions. These ones are different to other pendulum ones as the level is constantly being reset before the brakes are being applied each time.
My luggage trailer
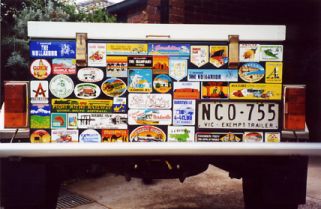
This trailer carried 2 water and 2 fuel jerry cans and the lid was made with a alloy skin and insulated against the 40*C (100*F) temperatures. It was fully lined with carpet and had a fluorescent light under the lid to light up the trailer and campsite behind. The suspension was from a Subaru with Peugeot wagon wheels (14x6) and light truck tyres (185x14R). The spare was kept underneath which still left lots of ground clearance. The screen on the front is to deflect the stones coming of the back of the XJ back down onto the road. The guards were made from stainless steel so I wouldn't have to repaint them after every trip. As you can see I have a fair collection of stickers from offroad and remote destinations around Australia.
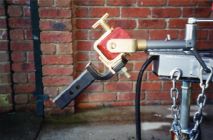
Offroad Coupling
If you are going to offroad with your trailer then you will require a coupling that allows you more movement than a standard one because it will bind and break when it runs out of travel. What I use is basically a large universal. I made this one myself out of solid rubber 4" square and high tensile bolts. The main rotating pivot that is welded to the drawbar is a 1" bolt through pipe of the same internal size with a grease nipple. The head of the bolt is welded to 2" by 5/16" thick flat that is in a 'U' shape. The 1/2" bolts that pass through the rubber block are sleeved in 1/2" water pipe. The other 'U' is welded to 2" square tube that goes into the receiver hitch and is held in place by the hitch pin. The rubber block also insulates the trailer from the car and I don't feel the trailer even when pulling it over fallen logs a foot in diameter. I have used this setup for over 65,000 kms. (40,365 miles) without a single problem. Full details on how to make your own like the Tregg one above are shown here. In the states the closest in principle that I can find is this one here.
Roof top tent
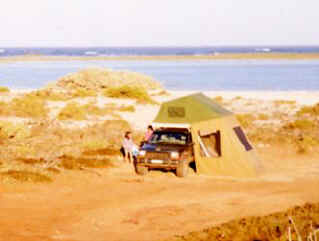
This is the roof top tent that I used in combination with the luggage trailer. It has a double bed on the roof which is left made up when you fold it up. A great thing is that you are a long way from the snakes and such while sleeping and also from flooding should the weather turn nasty. Being up so high also helped on hot nights as you were better able to catch a breeze. It was up in 5 mins as it used three bows similar to the trailer I now use with a peg in each corner to hold it down. You could get to the inside of the car from the tent through a large flap that could be unzipped. The base of the pack was made from fiberglass and was then fixed to three roof bars to the roof. The bed was accessed by a ladder that pulled in half for storage on top of the bed when folding every thing away. Now I get asked a lot if something like this is selling in the USA and the closest I have found is these sites; Vehiclerooftoptents, Loftyshealters, Top Bunks and Safaritrailers In Oz it is Aussie traveler and 3Dogs Camping but try also Shippshape tents as they are expanding into the international market as well.
My vision of the ultimate XJ trailer

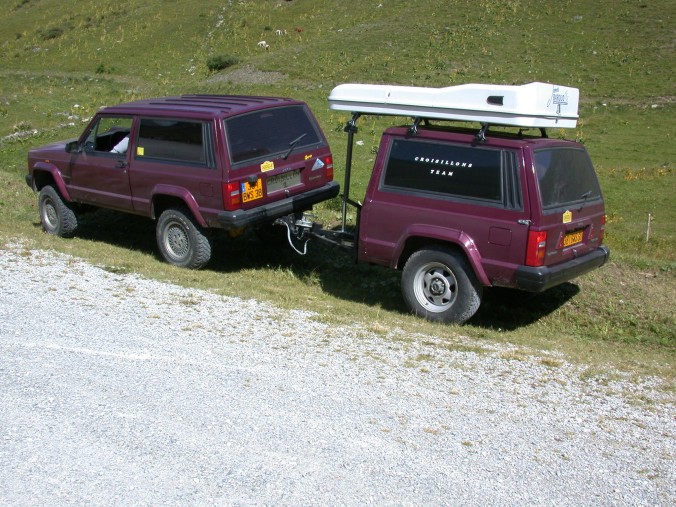
Just playing with Photo Paint and cutting and shutting two back halves would make a great looking luggage trailer don't you think? I tried to get a MJ ( XJ pickup ) tray for the last trailer I made, but they are unavailable in Australia. That would look great too if you matched the lift, wheels and tyres etc.
10 years later, this photo has just been sent to
me by Sanchez in France with his rig. Looks really good using the two door rear
half. ![]() You can
click on the image to get a larger one to view.
You can
click on the image to get a larger one to view.
[Index]