
Fitting Rear Airbags
For anyone that has quite a difference in load between trips I found this to be the only solution where you can keep the same height and ride at all times. I tried setting up the suspension to perfectly carry the load only to end up with it too high and too hard riding without it . With airbags you keep the same ride whether empty or loaded and keep the same level by adjusting the pressure accordingly. These will also level a sagged suspension but would not use them to lift higher than a maximum of 1.5-2". Better to lift some with a add-a-leaf as I have done here to provide half the lift in this case as trying to lift over 2" requires too much pressure and a hard ride results. These bags offer 8.3" of travel so are not suited to those seeking maximum travel for rock crawling but still had more travel than the Rancho shocks for Jeeps 3"+ of lift. Makes them perfect for those with changing loads and will even help keep you more stable in off camber situations. See also my other write up for extra tips on using it for higher lifts and information of another kit with longer bags and a more heavy duty situation.
I fitted a kit from Airlift #59507 with the best pricing I found from the same site. The same kit is sold under the Polyair brand here in Australia #34007. Try also here at Truck Spring as they charge less to freight ( $103 USD at time of writing ) it to Australia according to Wheeliebin on the Ausjeepoffroad forum.
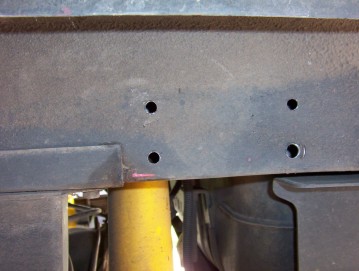
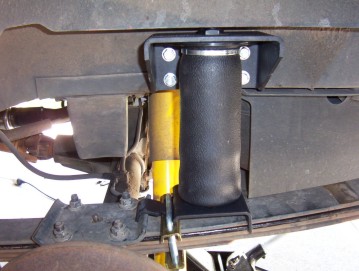
You have align the top bracket so that it is vertically above the bottom one which is pretty well fixed where it can go. I found that hard against the end of the bumpstop bracket was best. I then marked the screw holes after sitting the bracket level with the bottom of the frame. This worked out to be the best place for this particular XJ which had a Rancho add-a-leaf and OME shocks and Up-Country bumpstops. It is VERY important that you test to make sure when the suspension is at full down travel that it is within the allowed maximum length of the bag ( 10.5" ). If the bag runs out of travel before the suspension does, you will rip the bracket from the frame! Also you must make sure that you have enough bumpstop length to prevent over compressing the bag also ( 2.2" ). With mine, due to the higher lift, I turned the top bracket upside down and extended the bumpstops to work in with the travel of the bag. Before drilling the hole check to make sure you don't go through fuel lines or wires. The left side also has the shock cross member in the way so three of the holes are drilled at only 5/16" for the use of 3/8" self taping bolts to be used. The bottom rear on the left side, you can see above, is drilled 3/8" as is all the bolts holes on the right hand side bracket and also drilled right trough the frame so long bolts can be used with nuts and washers.

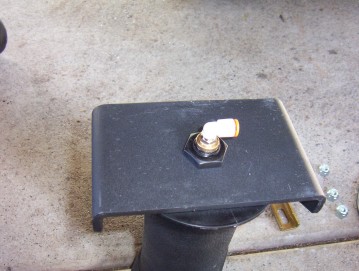
Make sure also that you have at least 5" between the inside of you tyre and the side of the frame where it attaches to give you enough clearance. Otherwise narrower tyres must be used or wheels with less back spacing or offset. Outside of Australia you may also be able to fit wheel spacers legally too as an alternative. The bottom bracket is fitted with a 1/2" bolt and washer loosely so later you can move the base left or right to align it correctly under the top bracket. Easier to fit the top plastic nut holding the airbag in place ( 15 ft-lbs ) and the airline fitting which already has Teflon tape in place. Do this finger tight plus two turns facing it the way you want to run the line.

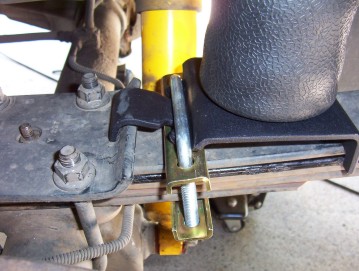
The three self taping bolts should not be over tightened and torque to 20 ft-lbs. As there are no anti crush sleeves used for the long bolts that pass right through the frame, be very careful not to over tighten these either as you will cave in the inside of the frame. These also only torque to 20 ft-lbs. Personally I think that rather than just using washing on the back on the frame, I would make a single 5 - 6 mm thick plate the same length as the bracket and height of the frame rail to spread the load to the much stronger top and bottom area of the rail or as I did for my own plating just this side. The bottom bracket on the same Air Lift kit supplied by PolyAir in Australia has an extra channel bracket to place under the mount on the leaf spring to help level it all up. It is a much better way of doing it as the kit I got directly from the USA ( thanks John for sending it ;) ) did not have this. For those in the USA, I would fit the supplied bracket on top of the leaf as shown and make a new one for underneath just out of some 6 mm strip of steel with the two hole in it for the U bolts or weld it directly to the spring plate as I show here. Otherwise you must tilt the top mount to suit the angle of the bag to keep it all square. Torque the bolts to 20 lbs and hammer down the front of the bracket so it sits over the end of the spring plate.


I chose to run the lines to the underside of the back bumper. I also completely covered the lines in split loom to prevent any possible chafing and extra stone protection etc as well. This is not provided in the kit. Make sure you cut the line squarely before pushing it as far as it will go which is 3/4" and then give the line a slight turn to seat it completely. I attached the line to the rubber plug coming through the body by wrapping a zip tie around it and through another zip tie around the line as shown above.
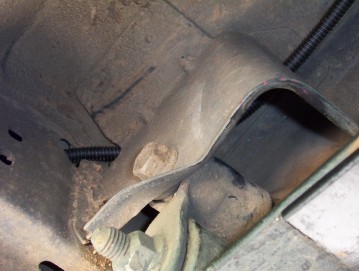
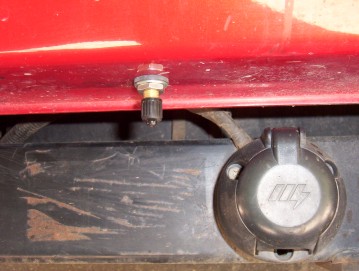
I then fed it through the hole at the top of the rear leaf spring bracket and then out the back corner of it before passing through the back panel as shown above. No holes were drilled to do this as all were there from the factory. This routing leaves it well clear of possible damage and shielded from the exhaust as well. A 5/16" hole was drilled for the end fitting with the nut, washer and rubber washer fitted to the outside and star washer and nut to the other.
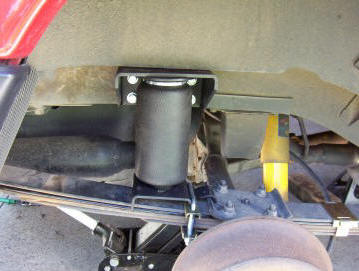
Now with everything connected inflate to 10 psi then view the bag from the back to see that it lines up directly under the top bracket. Just slide the base until it is if not and tighten the bottom of the nut down to 10 ft-lbs. There should be even space around the bottom of the bag once it is all aligned correctly. Check around the bag for clearance too as will have expended to 4.6" and must not touch anything. Then inflate to 30 psi and spray soapy water on the fitting to make sure there are not leaks any where. It is normal for the pressure to drop 2 - 4 psi over the first night but not more. You must also run with a minimum of 10 psi at all times. This is what I run when not loaded and will still raise the back about 1/2" but can feel no difference at all to the ride at this low pressure. I check the pressure every month but don't have to add any normally. It is also good practice to add extra air ( to around 60 psi ) BEFORE adding a load rather than trying to lift the load with extra pressure. You can then just let out any excess air to level the suspension once the load is on. To keep it level with extra load it only takes around 2 psi extra for every 100 lbs or 45 kgs. Never exceed 100 psi and you would not want to run any where near that anyway. Also be very careful when inflating them as only take a few seconds on the air inflator or strokes of a hand pump to raise the pressure a lot.
[Index]