Major Service items
Just a small number of things that are often forgotten or a few hints that make the job easier.
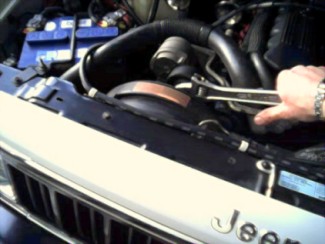
Changing the belt
The serpentine belt should be changed every 96,000 kms or 60,000 miles. I used on my '95 XJ with air-conditioning a 6 rib Dayco Poly-rib belt No. 6PK2500 which suits Australian models up to 12/95. After this a shorter belt is used with the part number of 6PK2275. Other models may vary in length so measure the old one to make sure. Not all models run a setup like mine so it only applies to them.
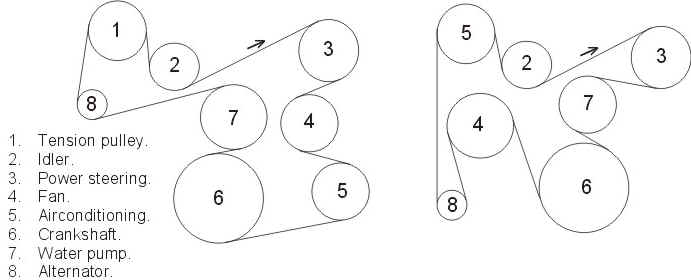
The left diagram is how my '95 looks, but if you have it like the right then you will not have the tension pulley and will have to do the adjustment by loosing the bolts above and below the power steering pulley. Correct tension on the later is when you can twist the belt exactly 90 degrees in the longest run between pulleys ( between 8 and 5 ).
If you have the same as mine then use a large shifter on the bolt that is in the middle of the tension pulley or a 15 mm socket and a breaker bar so you have enough leverage. Push down on it as far as it will go ( about a quarter turn ) and the belt will slacken and with your other hand remove the belt from the pulley the belt runs over next which is left of the thermostat. Simply remove from all the other pulleys and take it out. Fitting is just a matter of following the diagram making sure that smooth pulleys run on the back and the ribbed ones on the front of the belt. I find using a stiff wire with a hook will help position the lower ones before doing the top ones and leaving the pulley that you first pulled off the belt with until last. Push down again on the tension pulley again all the way making sure the belt is sitting on all the pulleys properly and sliding the belt over the last pulley. Releasing the pulley will leave the belt at the correct tension and double check the belt before starting making sure it is all ok.
Brake fluid change
The brake fluid should be changed once a year. This is because brake fluid is hydroscopic which means it absorbs water. When that happens it changes the compression of the fluid and lowers the boiling point as well. The moister will also cause corrosion in the braking system. Even after one year I notice an improvement in normal braking performance every time I change the fluid. I bought a brake bleeding kit which is simply a hose that you push over the bleed nipple with a retaining clip and a one way valve. This allows you to do it on your own and speeds the process. I always use a different colour fluid than the last time to make it easier to tell when all the old fluid has been flushed out. I used 750 ml. to flush the whole system thoroughly. Use DOT 4, SAE J1703 or better with the higher the boiling temperature the better. I use Castrol fully synthetic Dot 4 but it must not be mixed with any other type of brake fluid so flush well through with the new fluid.
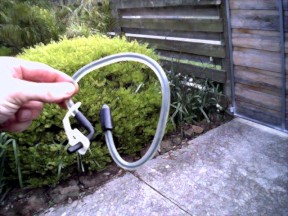
Start with the wheel the that the fluid has travelled the furthest away from the master cylinder which is the right rear. Attach the bleeding hose to the bleed nipple and the other end in a container and open the bleed nipple half a turn, ( the end of the hose does not have to be submerged ). With the bonnet up and standing outside the car so you can see the reservoir and peak under the car to watch for the colour change, push the pedal down but only as far as normal use and not to the floor. The reason for this is if there is any corrosion in the un-used part of the bore inside the master cylinder, the cups will be ripped causing a leak as it passes over the corrosion. Keep pushing until the fluid changes to the new colour and keep a constant eye on the reservoir to make sure it never runs dry. The first wheel will take about two top ups of the reservoir until it has flushed out and only about half a one for the other side. Tighten the bleed nipple up before removing the hose so no air gets in. Check to make sure you have a firm pedal before going to next wheel. Then go to the other rear wheel before going on the front starting the furthest away again until all is filled with the new fluid. Make sure the pedal is firm and the reservoir is at the correct level. Remember the brake fluid will strip your paint but can be removed with hot water which should be sprayed over each area the fluid has touched before moving on to the next wheel. That's all you have to do to get better brakes and longer life of all the components.
Power steering fluid
The fluid in your power steering should be changed every three years or 72,000 kms or 45,000 miles. This is important because as the system wears, the metal fragments continue to circulate causing more wear on all components as there is no filter system stock.
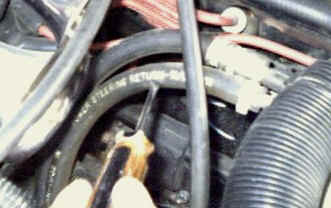
The filter must be fitted in the return line. The flow arrow points toward the reservoir.
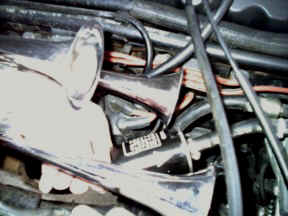
I have fitted a filter to the return line on my RHD above the coil which is not under pressure using a universal 3/8" inline filter for an automatic transmission available from any auto parts store. These look similar to a fuel filter but you can't use one of those. The line is now also diverted to run through my old auto cooler after adding another one below the bumper. Use the CLEAR power steering fluid by Mopar only as there is no compatible fluid by other brands except Valvoline Synthetic power steering fluid that Grant on Ausjeepoffroad found makes it for Mopar. It is clear so you will know if you have the right one in at the moment. Eventual pump failure is the result with early symptoms including cold start lock up and a noisy pump when turning. Do not use automatic transmission fluid either. To change the fluid you remove the return line from the reservoir which is the one that uses a standard hose clamp and put it into a container. Jack the front of the car and block off the reservoir where the hose was removed from and fill the reservoir to the cold line and start the car. If adding a filter then cut the same return line and add it to the line going to the pump leaving the cap on the other end of the filter and place the other end of the line into a bottle. If you do it straight from the pump, use a spark plug lead to block the port on it.
The oil was as black as the Soya sauce once in this bottle! The filter clamped and installed
Working quickly, turn to one lock and shut off BEFORE you here the pump is dry. Refill and turn to the other lock. When I had to do a full flush to rid the system of the wrong fluid I went through nearly 2 litres before is was nice clear fluid coming into the bottle. I even blew out the line from the reservoir to the filter by pulling out a bolt I had in the end of it and placing into the bottle and pressurizing it by putting my lips to it and blowing! Normally just go from stop to stop twice which should fill a litre bottle with the old fluid stopping and re-filling along the way. Attach the hose and top up reservoir and then WITHOUT starting the car again, steer left to right a dozen times slowly to the stops, to get all the air out of the system. Best to do this with the wheels off the ground. Repeat with the engine running checking to make sure no bubbles are still coming out. Check again after a road test to make sure level is right and if you hear noise then there is still air left in the system, so let rest for 15 minutes before repeating without engine running and then with.
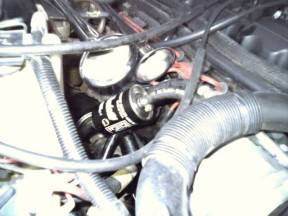
Transfer case oil change
The transfer case oil needs changing every 48,000 kms or 30,000 miles. This is a NP242 Selec-trac transfer which has the option of running in 4wd on sealed roads where the Command-trac doesn't. They both run the same fluid so the instructions are the same.
![]()
![]()
![]()
The two large drain plugs can be seen above and I just use a large shifting spanner to remove them. Start with the top one first and then with the catchment tray in place remove the bottom one. After draining replace the bottom plug and I always super glue a ceramic magnet from a fridge ornament on all drain plugs so the metal particles don't circulate but stick to the magnet instead. Then refill using a pump like shown with Dexron II or III grade Automatic transmission oil. Using a synthetic replacement oil can be a good idea. The Selec-trac will take 1.4 litres and the Command-trac takes 1.0 litre before it will start leaking out the fill hole indicating it is full. Replace the plug and your done.
Diff oil change
See my write up on in separately here.
[Index]