Brake Pad Change
If you have not got any warping of the rotor or gouging then all you will need to do is change your pads. Make also sure that the discs are not to thin or has a large lip where the pad does not run on the outer edge. If in doubt then have it inspected and machined. The minimum thickness pre '89 is 20.7 mm, '90 is 24 mm 4wd and 22 mm 2wd, with '91 on being 22.7 mm 4wd and 22 mm 2wd. Always check the disc casting in case they have been changed from Jeep original and the minimum. Runout out should be less than 0.1 mm. If you need to change the rotor as well then you can still use these instructions.
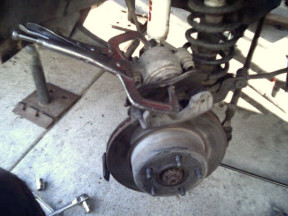
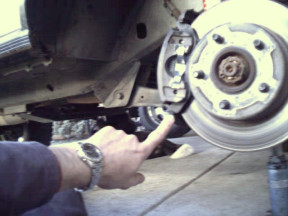
After loosing the wheel nuts 1/2 a turn and then jacking the axle so the wheels can be removed inspect the disc to make sure it does not need machining. All that is needed to remove the caliper and or the disc is two bolts arrowed above. Remove the caliper by pulling from the top and once free slide off the outer pad. You will need to push the pad inwards so the locating bumps are free from the caliper. Leave the inner pad so you can push the piston back by using a C clamp as shown or G clamp until it is as far back as it can go. Change the disc rotor at this point if needed.

![]()
As you are pushing the pad back keep a check on the reservoir as the fluid will rise and may need some removed with a syringe to stop it spilling over. If any does spill remove it straight away as it will strip the paint but not by rubbing with a cloth but pouring hot water over it. The pads are different left to right as well as an inner and outer. Shown above are two inners with the differences arrowed with one a slot (1) and the other just a tag (2). Just compare it to the one you have just taken off for the right one.
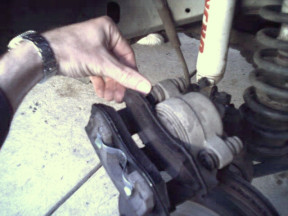
Push the inner into the piston cup and slid the outer on making sure the locating bumps ( arrowed ) insert into the holes. Push the sleaves which the bolts pass through back as they have a habit of stopping the caliper from going back on. Also clean the caliper slides and you can even add a very small amount of high temperature grease to them. If there is any glazing of the disc then now is a good time to remove it using emery paper in a circular motion. Place the two slots on the caliper slide at the bottom first and then hinge the top forward.
Pointed out is the two slots in the pads that should be sitting on the bottom caliper slide and the bolts are put back ( 30 Ft-lbs ) when to caliper is pushed forward as far as it will go. Pump the brake pedal up before starting the other side as it will lower the fluid level in the reservoir to make it easier to push back the next piston. No bleeding of the brakes is necessary but if the fluid has not been replaced in over a year it is a good idea to as it draws in moisture from the air and an improvement in braking will be felt after the change which I show how to here. Remember to pump the pedal back up before test driving and allow a time for the pads to bed in which will take a few good hard stops but be sure not to over heat the brakes while doing it. Check also the fluid level after this.
[Index]