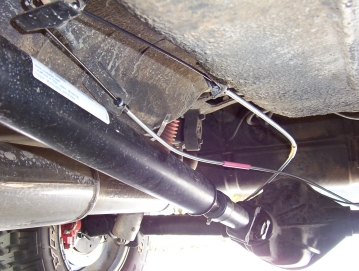
You can see the curve is much more relaxed when run to the opposite side on the 84-97 XJ's and maybe better for the 96-07 TJ's as well. I used just the short support spring to hold the cables up as shown into the original holes which are part of the seat bolt reinforcement.
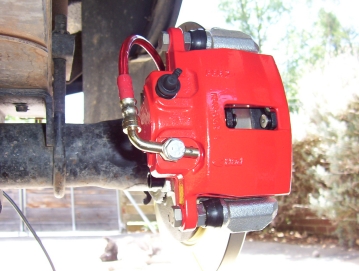
Fit the caliper in place after installing the new pads using the two 12 mm cap screws along with Loctite and build up the torque in stages to 110 Nm/81 ft. lbs. Make sure that the bleed nipple is higher than where the line attaches. The flex line can then be fitted with a copper washer each side of the banjo bolt with the grooves in the copper washer facing the fitting on each side. Do not over tighten this bolt and angle the fitting so that it is parallel with the side of the caliper.

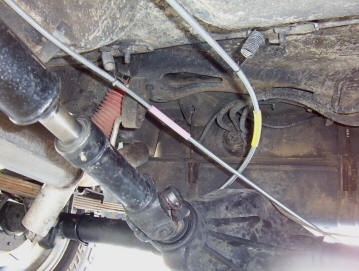
Next fit the new flex line into its bracket making sure that the grub screw in the end is tight. Use the retaining clip to hold it in place like shown making sure that the port in the fitting is facing across the axle. The hard line can be screwed in and support the fitting while doing up the line without over tightening.

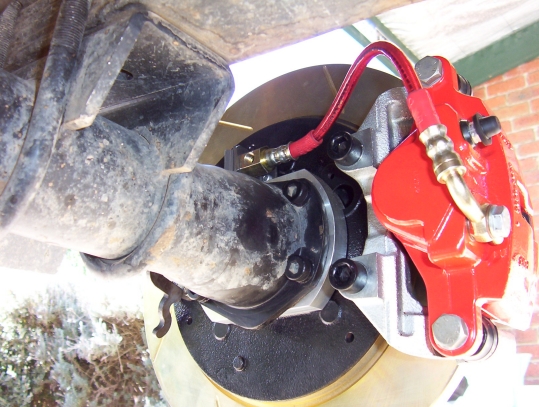
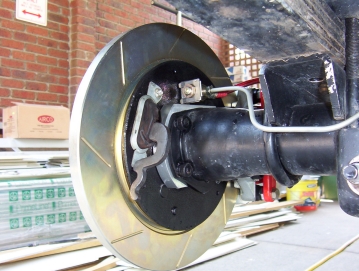
Make sure you have the slots in the rotor so that the outer edge on the slot enters the caliper first and can then vent out the air pressure through the bottom of the slot. You are looking at the left side here. Next it to fully bleed the system and would do front and rear as the same time. Brake fluid should be changed every 12-18 months as is hydroscopic, meaning it absorbs water and will effect your braking if not changed often.
Check all bolt connections, make sure mounting bolts and rotor bolts are properly secured, that brake pads are properly secured by retaining clips, that master cylinders and brake pedals are working properly, that brakes are properly bled with plenty of fluid, and that proper engagement of brakes occur when pedal is depressed. It is important to properly bed or seat-in new pads on their rotors. The rotors are zinc plated and will not function at peak efficiency until the plating is worn away from the friction surfaces. You will have a lower and soft pedal until both the rotor and pads have been completely bedded in.
To break in the pads, in a safe location, make a series of gentle stops from low speed. Start at around 15 kph/10 mph to prove that the system is functioning properly. Gradually work up to 30 kph/20 mph and 50 kph/30 mph again with gentle stops. Gradually work up to harder stops and higher speeds bringing the pads up to their upper operating temperature. If brake fade is experienced at any time the system should be cooled immediately. Drive at moderate speeds to cool the pads, do not apply the brakes during this process if possible. After initial cooling in this manner, the vehicle should be parked so that the pads can return to ambient temperature. This completes the heat cycle and will ensure minimal pad wear and maximum pad friction.
All new iron rotors should also be bedded-in before being used under normal conditions. Proper bedding-in will prepare the rotor surface, prolong the rotor's life and make it more resistant to thermal checking or cracking under severe braking conditions. The best practice is to use old pads while doing this and vice and versa but this is not possible after a brake conversion such as this. This is not cause for concern so break in the pads as told above and then proceed onto the rotors as follows. Make sure that the rotor surfaces are free from oils, grease and brake fluid. Run vehicle up to speed ( 80-100 kph/50-60 mph ) and make several ( 10 - 12 ) medium brake applications ( slow down to 30 kph/20 mph ), do not come to a complete stop, to heat up the rotor slowly. This will help reduce the chance of thermal shock caused by uneven heating of the rotor. Park the car and allow the brakes to cool completely( preferably overnight ). While driving the vehicle to where it will be parked, use the brakes as little as possible. When you need to stop the vehicle, get off the brakes just before the car stops and allow it to roll a foot or two before stopping completely. Do not hold brakes on after performing the bedding-in procedure until cooling is completed. This will avoid “hot spotting” or uneven cooling which can damage the rotor. Braking will continue to improve for the first 200-300 km/miles. Remember though that highway distance does not count in breaking in the rotors and pads and improvement you get but heavy city stop/start does.
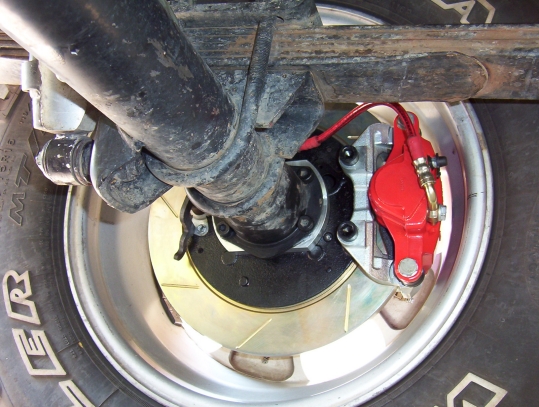
The end result will look like this and no more loss of rear brakes after each water crossing or brakes that go out of adjustment all the time. For D35 owners there is also now the added safety that the axle will not depart the whole car should a C clip fail or axle break as happened here. The right photo shows Jeepdownunder's D35 I fitted a kit to with Rubicon wheels and 265/70/16 tyres. He was also amazed to have such a good working handbrake for the first time ever in a Cherokee let alone the better braking.
[BACK]
[Index]