Transfer Case Spacers
It is very easy to make your own spacers to lower you transfer case to improve the driveline angles which is needed as soon as you are above 2" in most cases and you don't have as slip yoke eliminator ( SYE ) which is used above 4" of lift.
Materials
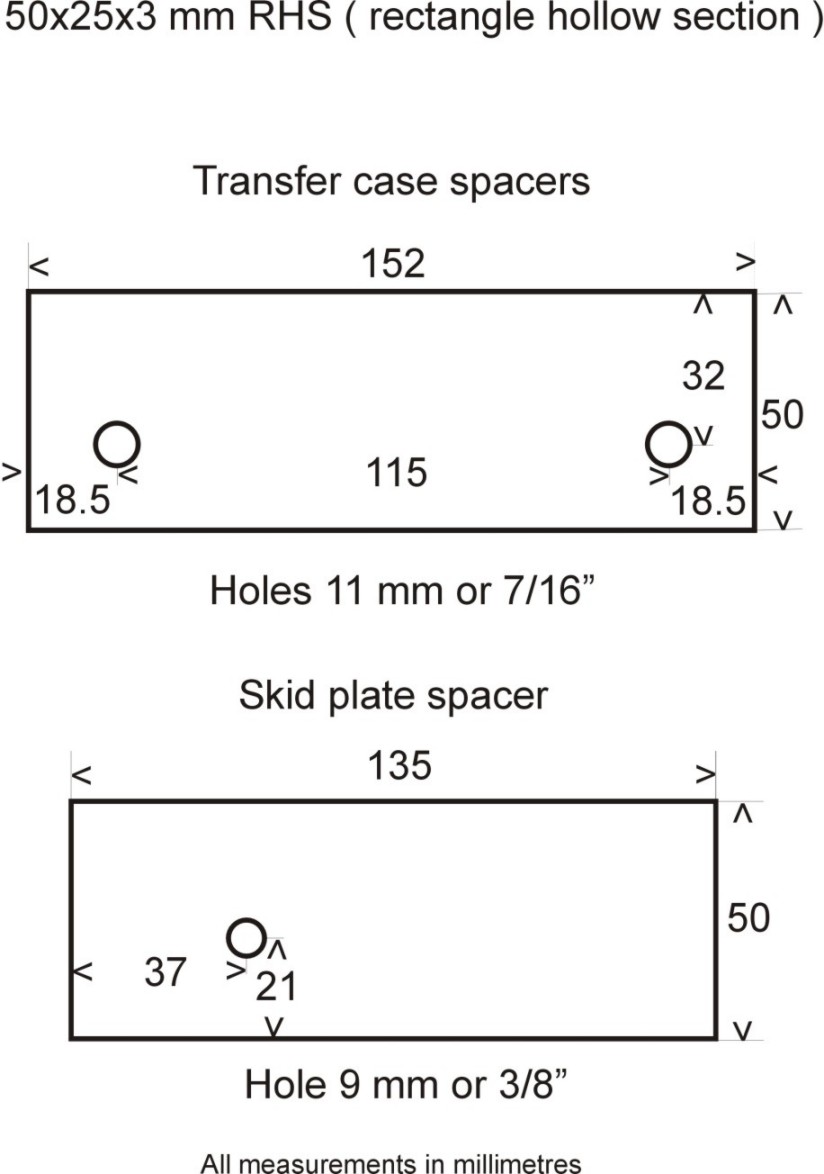
You will only need 1/2 a meter of 50x25x3 RHS ( 2"x1"x1/8" rectangle hollow section tube ) do the job including the factory skid plate spacer. The bolts you will need are four at 10 mm with standard pitch ( 1.5 ) at 2" long grade 8.8 and one at 5/16" UNC at 2" long at grade 8 for the skid plate with spring and flat washers to match.
![]()
Cut two at 152 mm and one at 135 mm if you have a factory skid plate ( if you don't lower the skid as well it will hit the transfer case ). Follow the diagram above which you can click to enlarge and you will notice that the holes are off centered to the side and this is to get the spacer flush with the end of the cross member and skid plate. I pilot drill it first with a 3 mm drill before the final size.
![]()
![]()
Enlarge the holes and de-burr the ends and then it is simply a matter of priming and painting them. You could add plastic end caps if you like to finish them off.
To install them you simply place a jack under the middle of the cross member but install one side at a time making sure the other side is left bolted in place otherwise lining it up will be difficult. Leave it with slight pressure on the jack and then remove the bolt then the other can be removed by either loosening the nut a turn before adding another nut which is tightened against it while still holding the first nut with a spanner. With the two nuts locked together you turn only the original nut causing the stud to turn with the nuts and un-screwing it. A faster way is to just remove the nut and using a very tight vice-grip, just un-screw the stud out.
Then lower the jack just enough to slide the spacer in making sure the spacer is flush with the end and inserting the new bolts. You may have to use a Phillips head screw driver in one hole to lever it into position while you tighten the bolt to 30ft.lbs and then adding the second. Be very careful not to do this too hard if you don't have a torque wrench as it is very easy to strip the nut and using Loc-tight to stop them rattling loose is a good idea. It helps to choke the ratchet by placing your hand next to the socket and not on the end to reduce leverage. If you happen to strip it and it is very easy to do, then drill out the thread with a 3/8" drill before using a 7/16" UNF tap and replace with that size bolt, ( seat belts are held down by the same size bolt ). The other side can now be done by lowering the jack a little more after the bolt and stud have been removed and the rest repeated in the same way. The skid plate is just a matter to remove the holding bolt, placing in the spacer and tightening very carefully and I like to add a self drilling screw to make sure the spacer stays in place.
![]()
![]()
I am at 4" of lift and added a 2 degree shim to raise the pinion to further reduce the pinion angle and keeping the relationship between the two universals the same and I have no vibrations at all. The shim goes in between the leaf spring and the axle perch it sits on with the thin side facing forward. I used some shims from ARB #OMECW2.
Before starting the Jeep, make sure you have clearance around the bottom of the mechanical fan as that will tilt towards it with the drop some. More of a problem if you engine and or transfercase mounts are old, sagged and or cracked.
[Index]