This a write up on fitting control arm drop brackets to the front of the Cherokee. These are necessary when the lift reaches 4" or more. This is because the angle of the arms is getting too great at this height and the ride suffers because of this. Every time you hit a bump, even on the road with angled arms, the arms actually force the tyres harder into the bump because they have to go forward and up rather than just up if level. The steeper the resting angle of the arms, the worse this is happening. You are no different than the old leaf sprung front end that had the shackles at the front. Also, I have seen photos of a axle at full droop when climbing a steep hill, then try and climb a ledge. Well rather than compress the suspension, the whole axle, control arms and shocks, got forced UNDER the Jeep. The only thing holding the axle back once it drops too far, is the top two little 10 mm nuts on top of your shocks! All force in very steeply angled arms wants it to go under the Jeep and can even be a cause of flipping the Jeep. The easiest way to test this is push a piece of timber along the concrete and over the lines that are pushed into it when wet, like in the you can see in the picture below. Now if you push the timber along basically flat, you will not even notice them. But now rise you hand and push over it. At first it is just felt as a small shock when passing over the line but as you get steeper, it gets hard to just even go over it. Once past a certain point, the bottom on the timber will stop and the end your holding will try to go over the top instead. This is what is happening with a lifted Jeep that has the steep control arms.
Now Rubicon Express and Trail Master both sell a bolt in kit to lower the control arm mounts. Also just in and featured at the end of this write up, Rough Country also now make a kit in 2008 including braces. The Trail Master however does not sell a brace kit that you MUST run with it to prevent the brackets getting ripped off the frame. However, the RE braces do fit the Trail Master bracket as well I have been told. There are better prices around than shown on the RE site. I bought mine from Dirk at www.dpgoffroad.com. It can also be addressed by fitting a long arm kit providing the arms do reduce the angle as not all do. Some have the brackets tucked up that high that this is not so. Also a long arm setup can cause too much weight transfer and therefore instability on steep climbs. This is sometimes means that limiting straps have to be employed to prevent too much droop.
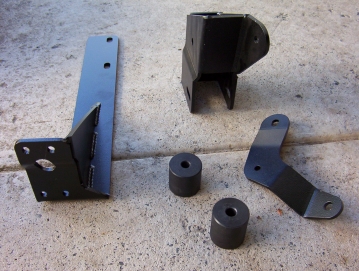
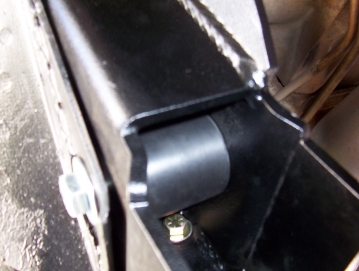
The first photo shows one side complete with brackets for upper and lower control arms, spacers and braces. Work on one side only at a time. The first thing I did was flatten the dimple you can see at the bottom on the backside of the bracket. This will stop the braces bolting up flat against it later on in the install.
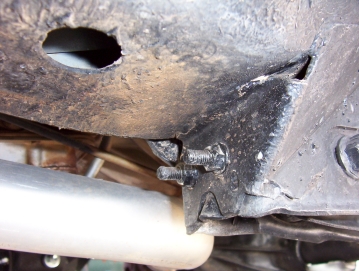
I just hammer the dimple flat and then touched it up with a grinder so as much as possible of the material was left. The stock control arms were dropped out at the frame end and the inner C, that is held in place by the two nuts on the back of the lower frame bracket, was removed as well. Working on the bracket that fits into the lower mount, it is best to fit the two upper bolts, that will go through the holes left by the C bracket, in first and try to slide the lower mount in. Remember that the 'ear' part of the mount must be on the inside.
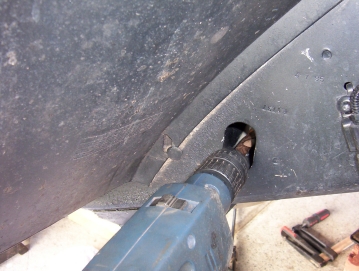
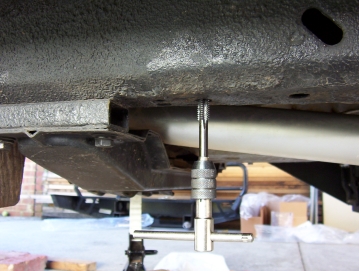
Once you have those two upper bolts in loosely, fit up the spacer and the main bolt through it leaving off the nut as another bracket still has to fit over it. Make sure you have the right spacer as there is a pair for the upper ( 2" long ) and another for the lower ( 2-1/4" long ). Leave everything LOOSE unit the EVERY component is in including the braces. You do have to drill out the old upper control arm hole to 1/2" to fit a stronger longer bolt. You will need a fairly long drill bit as it has to pass through the frame as well as right out the other side of the other half of the mount.
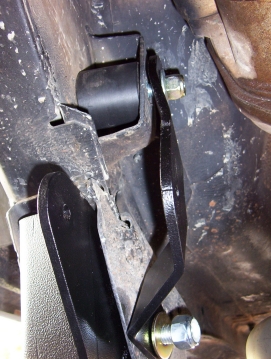
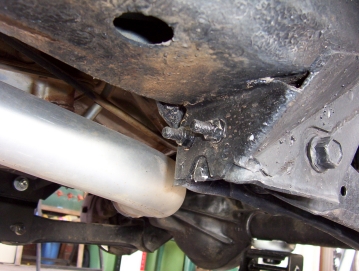
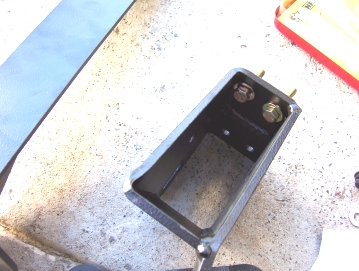
The first photo will enlarge if you click on them. They show the spacer fitted into the upper old control arm mount with the brace fitted to the outside of it that forms the other half of the upper mount and continues down to the bolt holding in the lower mount. The brace is left and right so make sure that the centre hole that forms half of the new upper control arm mount, faces forward and is opposite the 'ear' of the new mount. Before fitting up the brace, I tapped an un-threaded insert that I think is a locating hole for a alignment or assembly jig during the Jeeps manufacture. It is not in the instructions or have I seen it done by anyone else, but it pulls up the brace in the middle hard against the frame and holds it in place to stop the brace from pulling sideways when the cross member is out. I tapped it for a 3/8" UNC high tensile bolt from memory.
[Next]
[Index]