
Rear Head Rests
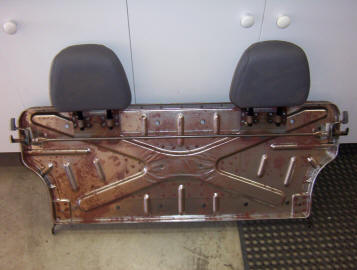
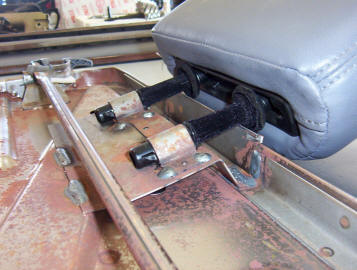
Just stripped a rear seat to show how the head rests fitted to Australian and European factory ones are fitted. I can fit front ZJ head rests into my back seat brackets. So using those or the brackets and head rests from a rear ZJ seat may also be possible?
This shows watch it looks like with the cover and foam un-zipped. Also a close up of how the metal is folded.
Look where it has been welded in place. Those spot welds are not for the head rests but for the angle.
I have a photo above to show where I measured from ( outside of the catch bar ) to show placement of the brackets. The first bracket starts at 253 mm and ends at 417 mm ( not shown ) with the second at 900 mm and finishes at 1053 mm.
I cant send these over at all as the nearest Jeep wreaker to me is over 2 hours return for me. Also the size is over what they will send via ordinary post ( 1305 x 545 mm plus the thickness of the headrests and upholstery ) without any packing cardboard or upholstery which will add a lot to the weight as well. The weight stripped and with the head rests as shown in the first photo is just under 20 kgs. These shots were taken at the wreckers ( www.usadriveline.com.au ) which may send over to you via a freight company but they estimated $380 USD for the freight alone. You should be able to just use the foam and upholstery of your existing seat as there was just the holes punched out for the post holders to go through which was stretched over the wide part that sits above it. Best to try and see if ZJ brackets can be used and first mentioned.
Well Markos from Fountain Hills AZ decided to try my idea of using front seat headrests for the back seat. He used a extra set of front XJ seats for the conversion below which has worked out looking factory.
After gutting the front seats he found the headrests welded to the seat frame like above. Cut the welds through with a cut off wheel on a grinder to end up with the bracket free as shown.
He found that the stock rear seat foam already had the moulded spot for the headrests. So this was used to determine where the bracket needed to go which was 8" in from each side.
He decided to recess them into the back a bit more than the stock way as shown above in my photos. The notches are needed if going the same way and the main rib was cut and flattened out.
Here you can see how he recessed the bracket into the main rib pressing. The further away shot shows the positioning.
Here it is as viewed from the back. The foam and upholstery was put back in place. The holes were then felt out through the fabric. You can see the craft knife being used the cut a circle around the fitting.
The plastic inserts and place back into place and the headrests fitted. Final photo shows the finished job looking very factory. The headrests still clear the factory spare even after being fitted further back than stock.
[Index]