Building an off road trailer
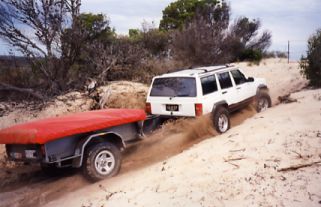
These are the plans I have drawn up of my offroad trailer. This has been tested over some the most severe roads and tracks the Australian Outback has to offer. I have never had the slightest thing go wrong after all these years! See the trailer page for more info and pictures of the tent setup as well and the trips section for where I have been through out Australia with a trailer in tow.
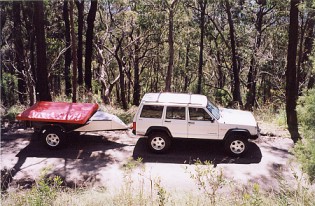
The trailer was made with the same track, wheels and tyres as the car along with the stud pattern giving an extra spare for the car as well. The trailer is only 300 mm high as I wanted it a low as possible so I could see over it through the rear view mirror and keep the COG down as well. I had a smaller trailer that was only a meter square but 600 mm high which fitted in everything I needed so with this one being twice as long I could go half the height! This stops things bouncing around inside as our pillows sit on top of the plastic boxes stopping anything from ever moving. It also stops us from packing more than we need too.
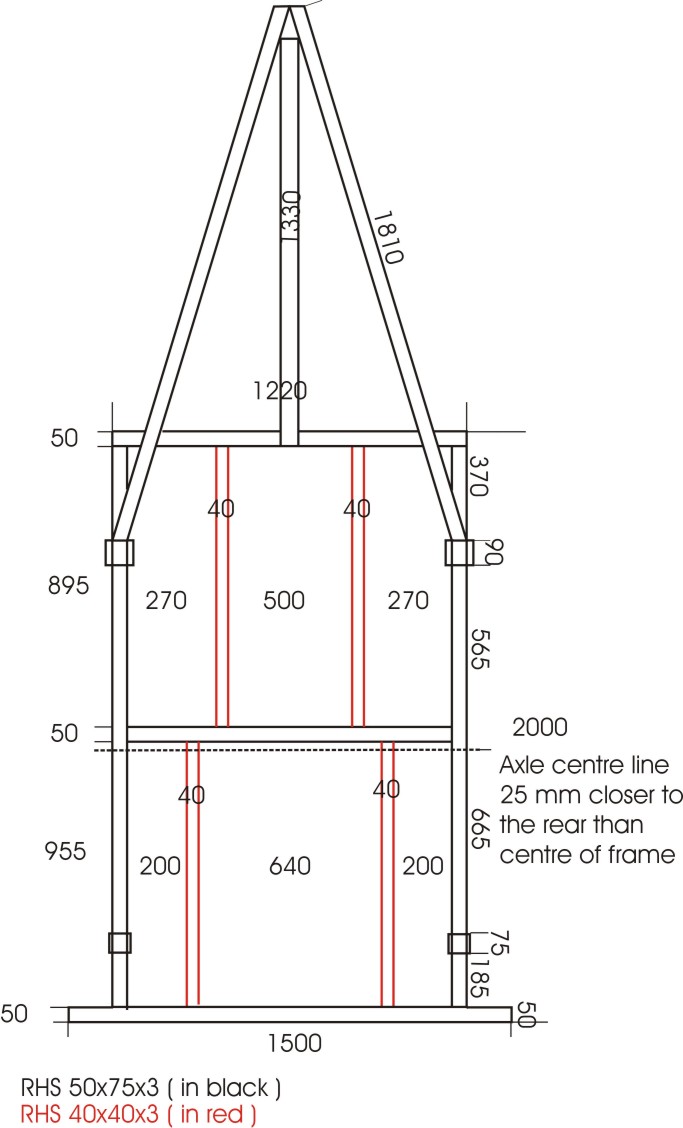
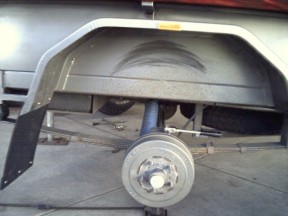
The plans above show as viewed from underneath. All measurements are in millimetres unless noted. The frame width of 1220 mm may need to be adjusted to suit the track width of the tow car to allow enough inside tyre clearance. This was set up to fit within the total width of my track of my XJ with the trailer originally running stock XJ wheels which have a 5.25" of back spacing on a 7" wide rim with 30x9.5x15 BFG AT tyres. It only just touched at full angle stuff with these tyres on the inside. I now run 245x75x16 BFG AT tyres on a 16x8.5 wheels with 4.5" of back spacing with plenty of clearance and means that the overall width from the outside of one tyre to the other is the same as my car which runs a wider 275 mm wide tyre ( inside track width is wider on the trailer ). Your best off to measure the width between your wheel arches of the car and make the trailer this width. I however went with the widest body I could but still keep the overall track width from one outside tyre to the other the same as the car. I would prefer to run identical tyre size and track but would have to replace my whole axle to do it as the axle ends are machined into the solid 50 mm square bar! Note that the extra width of the rear most cross member is to support the taillights and also the sides if the support for the hinged camper pack was not there. This extra width would also have to be added to the front if the front of the trailer were to have a drop down tailgate at that end also without a cross support and braced to the top of the sidewall of the trailer.
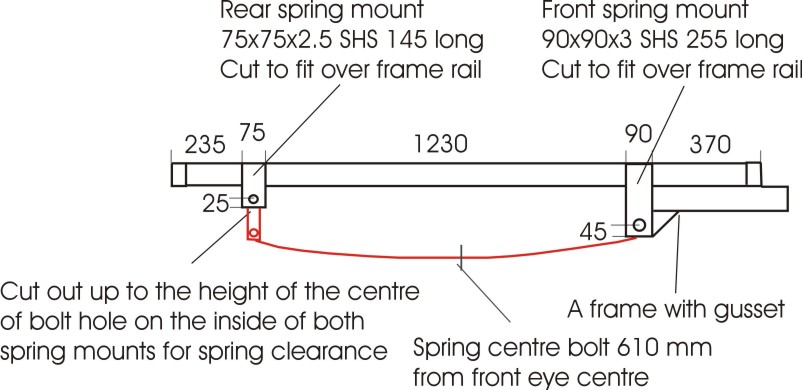
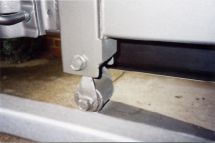
Note that I have the front spring mount much lower than the rear which is not normally done on trailers but is always done on all other vehicles. Ideally the front spring eye should be at the same height as the centre line of the axle. This gives the least rear steer possible as the suspension moves. People that have driven behind my trailer have commented on just how well it tracks and like no other they have seen. None of this swaying left to right each time you run through a dip in he road etc. It must be noted that for a bit smoother ride still, the shackle angle shown is a bit steep and the rear shackle mount needs to be moved 20 mm forward or closer to the centreline. For the spring mounts I used SHS ( square hollow section ) that measured on the inside the same as the width of the spring bushes. The side facing the axle on both mounts was cut out to the level on the bolt as you can see above right. On the rear one a piece of flat bar was added above it due to the thinner wall which was not necessary on the front one. I remember trimming a little off the steel pipe inside the bush to make it clear so I could get slightly thicker wall thickness on one end. The front mount is supported by the end of the A frame rails as well as a gusset. If you are using other springs other than XJ up-country ones with a Rancho add-a-leaf like mine, you should still end the A frame at the front mounts and move the mounts to end up with the spring centre pin or axle centre ( 1025 from front of main frame ) in the same place. I choose XJ ones as I was carrying around the same weight as the rear axle in my XJ and then would have spare springs for it should one ever fail! In Australia I would recommend ones off a Ford Falcon Ute or panel van ( if total weight is over 750 kgs ) or wagon if less as they are plentiful for spares should one should ever break out the back of Bourke. The front mounts would need to be moved forward 20 mm along with the A frame ends and the rear one moved back 130 mm for any of the late Falcon springs. The rear mount for the Ford leaves just un-bolt so no mount has to be fabricated except for some plate with the 2 threaded holes in it to accept the mount.
Longer leaf springs are far superior to the short ones offered by trailer suppliers as will carry the same load but with more suspension travel therefore stopping the transmission of vibration and bumps into the frame. I have never even broken a jar of jam in all these years ( others with me have smashed most glassware and had to carry them in the car from then on! ) and over 120,000 kms of travelling with a trailer around Australia. Yet I see failures on trailers on these roads all the time with suspension mounts often being broken off and frames breaking due to the vibration transfer that these short springs give causing fatigue on these points. It is important however not to go too soft as running out of up travel is just as bad. On that note also I cannot believe that trailers never seem to come out with bumpstops! I have had to repair trailer floors and frames for this very reason from so called off road trailer experts! I run a XJ bumpstop of 80 mm of height as what good for the car is good for the trailer!
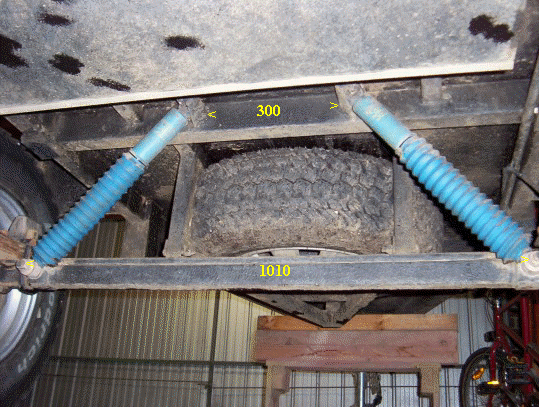
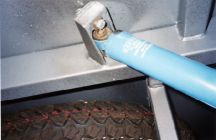
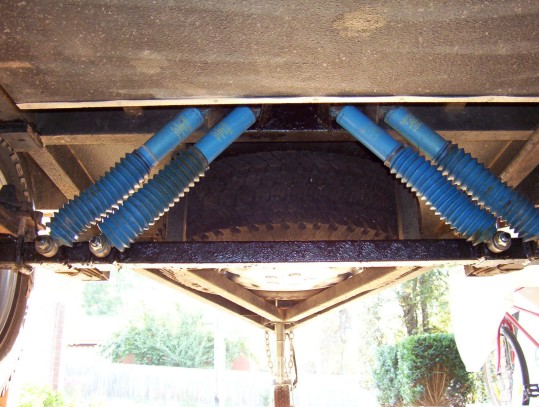
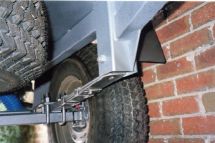
The rear shocks are original XJ up-country ones for the rear which the springs are from as well. The top mounts are 300 mm between the brackets and are made from 50x3 SHS with one face cut off and 20 mm SHS tube welded across the ends to which the shocks upper bar pins are bolted through. The lower mounts are a piece of 50x5 SHS cut into a channel just deep enough to clear the fully welded grade 8 bolt head inside it then mounted vertically. Two pieces of 50x5 flat bar were then welded top and bottom of it which then sit over the width of the axle and mounted 1010 mm apart from the centre to centre line of the bolts. XJ bumpstops were used 80 mm high. I have since added another set 4" inside these as found after 55,000 kms there was a little cupping on the tyres.
[Index]