Long Range Fuel Tank.
I am showing here what is involved in fitting a long range fuel tank. This one is sold through 4wd Systems in South Australia. It is advertised as a 125 litre ( 33 US gallons ) full replacement tank. Fully baffled and made from 2 mm thick steel. You start by removing the old tank which is best done with as little fuel in it as possible. The tank guard is taken off by just un-doing 4 bolts and dropped away. I found mine full of stones ( some quite large ) and red Outback dried mud even though I high pressure spray in there as best as I could after every trip. Would have caused the tank to rust over time but had not started yet on mine. Then remove the cover over the filler hose and breather so you can get undo the hose clamps holding them. Take off the fuel lines from the front of the tank as well as un-plugging the wiring harness. The tank is only held in by the 2 straps. Place a jack under the tank and loosen off the nuts on the long threaded bar just enough that you can un-hook it from its key hole shaped mount. Lower the tank down and pull the filler and breather hoses free when you can.
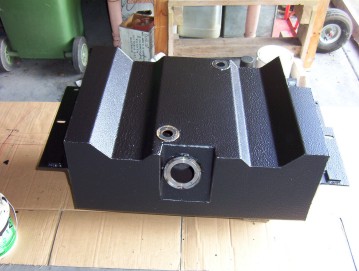
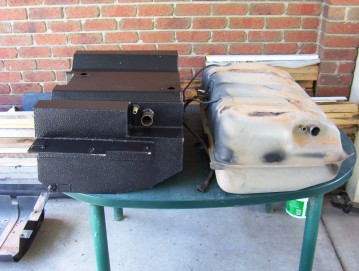
The new tank came in a hammer tone finish but I went over it with a rubber and tar based product called Grip 51 which I applied using a medium textured roller. I used this under the whole Jeep and trailer also as is very good at protecting against stone damage. You can see in the side by side shot that the extra volume is mainly in the squarer corners and that it takes in the width of the seamed area of the old tank too. It is just over a 1" deeper but is sloped up to not reduce the departure angle.
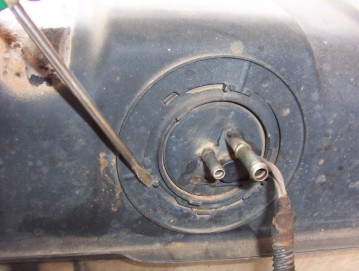
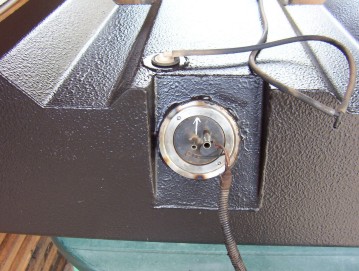
The old sender and pump and breathers are used so have to be removed from the old tank. The two breathers are held in rubber grommets which are levered out of them and transfer across. Orientate the breather hoses in the same direction as the were on the old one. To get the pump/sender unit out you need to knock the holding ring around as shown until it comes free of the holding tabs. Should use a brass punch to stop any possible sparking unlike what I have shown! Then just carefully pull the unit out making sure nothing gets hooked while doing so. I would bend the sender float so it faces the opposite direction, or 180* from stock, across the top of the pickup sock as did have some trouble of it sticking to the baffle inside the new tank.
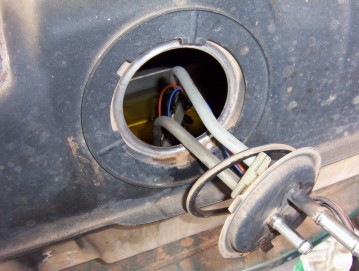
The pump/sender is placed the same angle and distance from the bottom of the tank as the stock one. What this means is that you sit on full for quite a long time before the gauge starts to fall. At least empty still means that which is the most important. I marked what was straight up on the face as it is easy to tilt it otherwise. The new tank has the unit held in place with a large screw in ring which is turned using a punch and hammer. You do have to trim off a couple of locating tabs to be able to fit it over the pump/sender unit. Make sure you fit the old rubber O ring dead centre first and hold it in place with some drops of super glue to stop it moving while installing the unit. Better still is to tilt the tank up until the sender part is flat so the O ring wont move when fitting it. Now place the filler and breather hoses on the new tank taking careful note on how they sat on the old tank. Same as above in case you forget.
Now the tank brackets are welded to the side on the tank and go on top of the tow bar mounts if fitted. Use the 10 mm spacers if you don't have one. I found did find interfered with my factory towbar and had to just trim a little off the side of it as shown above. Make sure also that the towbar thickness is the same as the 10 mm spacers so as not to distort the bracket when bolting it up. I found mine was 8 mm so ground 2 mm off the welded on spacer and made a new one for the middle bolt to go though. Was a bit tight pulling up the last couple of mm doing it that way so using a 2 mm spacer on top of the towbar might be better.

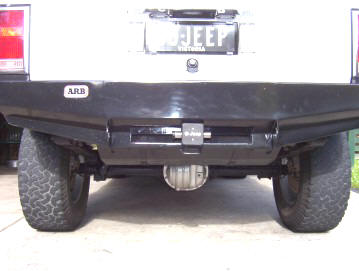
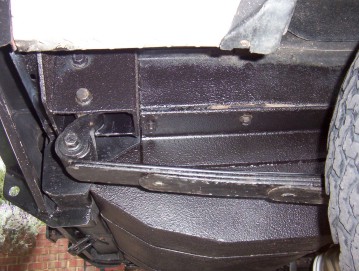
Now they only use the 4 mounting bolts that the old tank guard used with this brand of tank but that does leave the front and heaviest part of the tank un-supported. Was not happy about that so dropped the tank again and installed the old tank straps as well. I made up an extension for them as shown out of some 3 mm strap steel and now the tank sits very firmly up against the floor. The LRA tank for the Cherokee only uses the 2 straps and no bolts at all along the side. Think I have the best of both now. With my 4.5" lift you can see it is not noticeable at all from behind or the side in the picture below.
Now I measured out exactly 5 litres and added that to my tank to see if you could still drive with so little. I live at the bottom of a steep hill so it was good to see that I had no trouble driving up it and to the service station 2 kms away. I filled the tank and found it cut off pretty early but was then able to continue at a slower rate as the fuel moved past the baffles into the other sections. But the most I was able to fit was a 117 litres including the 5 already in there. Have spoken to others and this is fairly typical for after market tanks to under fill as they seem to include the expansion volume as well! But with a highway range now of around 900 kms ( 560 miles ) unloaded ( based on 13l/100 that I often get )( 21.3 mpg imperial or 17 mpg US. ) and 730 km ( 450 miles ) ( around 16l/100km )( 18 mpg imperial or 14.6 mpg US. ) pulling my trailer it is a worth while improvement.
Just found this write up for those in the USA: http://www.4x4wire.com/jeep/tech/fuel/nwmp04/ and they are also sold here at Rocky Road. They are half the price that JCWhitney sells them for! Also a 30 gallon one from Aero Tanks and also NWMP. None listed for a 97+ but wonder if you could use a 96 pump and sender which does not have the return line either like the 97+ and use the earlier tank. You would have to add a inline filter the same as a 96 and earlier which is a bonus. These pumps also run at the same 49 psi as the 97+ unlike the 95 which has the return line and only 39 psi.
[Index]