Replacing the mechanical fan with an electrical
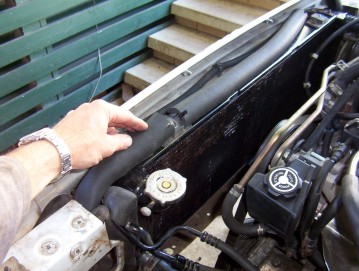
Cherokee's come with a electric fan already but also a mechanical one that uses a viscous coupling. The problem with that is the they still cause a lot of drag on the engine to turn as they weigh 5 lbs. According to Flex-a-lite site up to 12.5 hp can be gained by removing it but I would think that would be a fixed heavy multi bladed one rather than one with a viscous clutch! Still it would be some and have read on another site that an XJ would gain around 3 hp which seams more realistic. The manual viscous coupling fan hub are also un-reliable as they get older and might not lock up fully when the engine is hot as they rely on air temperature around the clutch and some transferred from the bracket attached to the engine to say if it needs to lock up or not. Too bad if you are working the engine hard on a cold day! The fluid can also leak out over time and it is hard to know if it is working probably or not as you can only try to check to see if there is resistance when the engine is hot enough for it to cause it to lock up.
Now I must stress that this is not a conversion to do if you have over heating problems unless it has been caused by the viscous coupling failing. Then it will help but other wise you should be looking thoroughly at your cooling system to make sure that you radiator core is not blocked at all inside or out and that your thermostat, cap and hoses don't need replacing either. That said though, I have had since this write up others with their cooling problems solved after the conversion. Electric fans are more efficient than mechanical ones as they are designed to move the most air at a set speed but a mechanical one has to work from idle to the red line which will compromise it's efficiency. This conversion better suits those that are after a bit more power and economy and quieter running! Remember also that a puller fan ( engine side ) is about 20% more efficient than a pusher fan as the motor blocks a lot of area among other factors including all the support brackets and guard by being in front of the radiator stopping any air entering at that point. Mounted on the backside the air is free to pass through even if it is not assisted directly in front of the motor and the pressure has also dropped by this point.
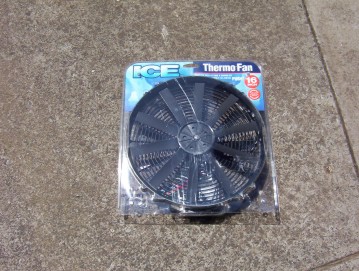
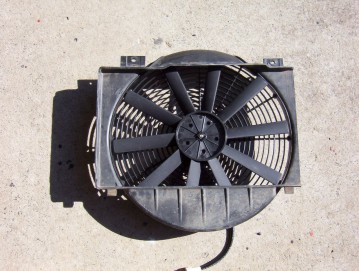
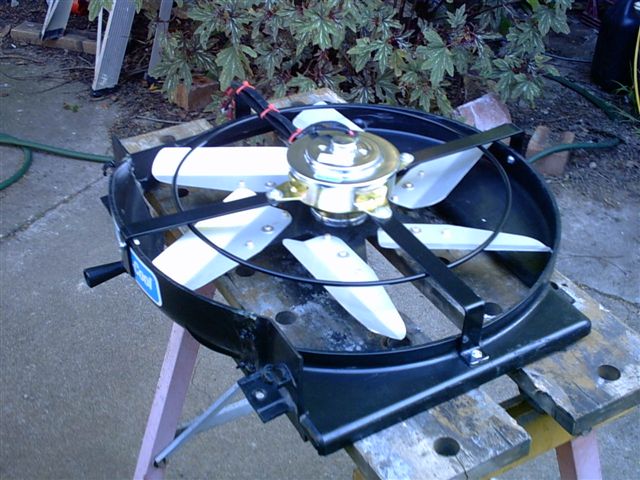
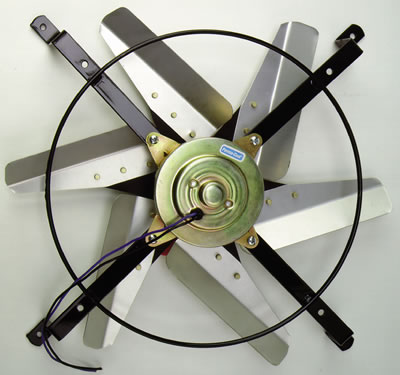
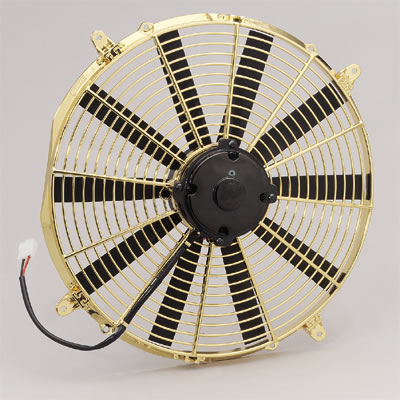
Now the mistake that many have done when they tried to replace the mechanical fan with an electric one is that they have used too small a one with a lower CFM rating than the mechanical one. I spoke to the company that built my custom 3 row radiator and he stated that our XJ's need a CFM rating of 2000 minimum to do the job and around 3000 CFM if towing a lot offroad to replace the mechanical one along with the standard electric one. Generally this means a fan of at least the same size ( 15" ) as the one it is replacing or bigger but there are some 14" ones out there that pull these CFM numbers. Check your shroud fan hole size too as some can only fit the 14 or 15" fans in there. There are 15" and 16" ones so. Only one was rated above 2000 CFM at 2500 CFM and it was slimmer than the other one as well. It was made Unipoint and sold under the ICE brand here in Australia. It was set up as a pusher ( a pusher only runs at 80% of a pulling number if run in front of a radiator ) so I had to flip over the fan blades as instructed ( concave side towards the motor ) and reverse the wiring on the motor. I did a search here for you US guys for 15" and 16" electric puller fans on Summit Racing turned up quite a few that could be used. Remember though that it must be at least 2000 CFM or above and the more the better. Perma-Cool have a 14" ( part no. PRM-19114 ) and a 16" ( part no. PRM-19115 ) rated at an impressive 2950 CFM and have pictures of an install at the bottom of this write up now after John tried it out after reading this suggestion. These can be able to be bolted directly to the back of the old shroud but the 14" one should have the extra inch added to the shroud to get it closer to the fan blades to improve it's efficiency. There is even a GOLD PLATED one listed at 2700 CFM ( part no. SUM-G4836 ) by Summit Racing. See here also a write up just done using a 16" Zirgo fan rated at 3300 CFM on a LHD. There is even one out now that is 3895 CFM but best of all is the 2 speed Ford Taurus fan pulling 4500 CFM that I have now since fitted.
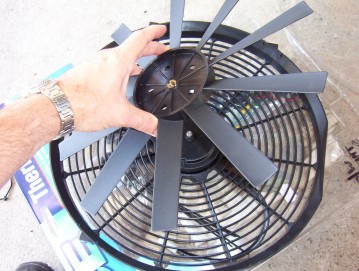
Now there is no point mounting the fan directly to the core as for one it is very bad practice for any 4x4 as they will rub holes in the core. Secondly the fan will only pull air through a very small area as the radiator is only 11" high so the rest of the fan would be wasted let alone the corners would be missed as well. So what I did is mount it directly to the stock shroud. To make this work however I had to remove the flared out part shown above from the fan to give a chance of fitting. I did this simply with a utility knife.
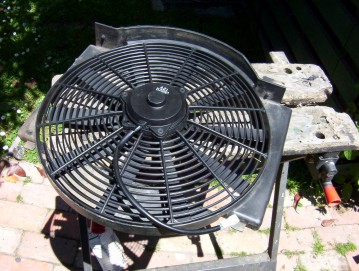
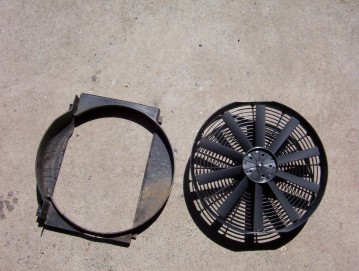
The only thing was the opening in the shroud was 408 mm ( 16.06" ) but the fan measured 412 mm ( 16.22" )! So using a angle grinder I carefully thinned the shroud lip by 2 mm all the a way around with a little extra near the top as the shroud hole was not perfectly round. Remember also that some models only have a 15" opening so measure first! It took some patience but got it done as shown above and mounted the fan with sealant and riveted from the inside out with small washes on the outside so they would not pull through. If you rivet it from the outside in, the fan blades will hit the rivet ends. Be sure to mount it with where the wires exit the motor facing downwards. This will stop any water that might enter, staying in the motor.
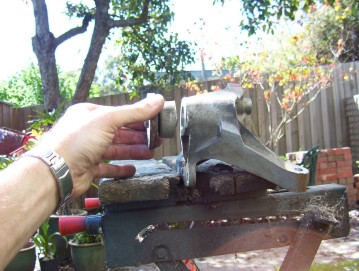
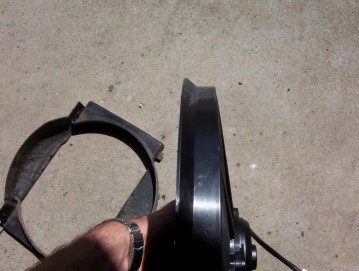
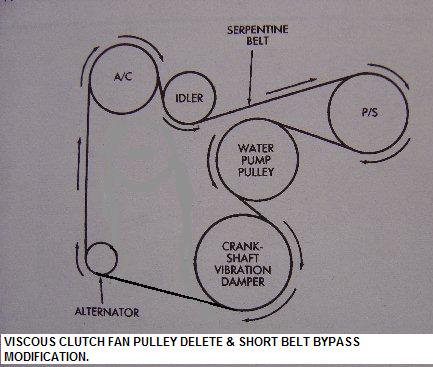
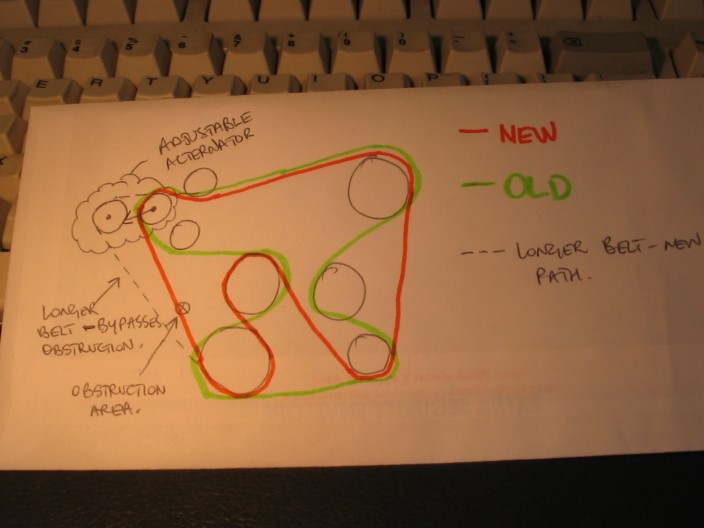
Now what I did next I have not seen done before on an XJ fan swap. I saw no point in keeping the old fan bearing mount as that still adds drag to the engine however small. I also needed some extra clearance to clear the motor on the back of the fan. So what I did was chop off the whole front off the mount and then knocked out the bearing and shaft with a hammer to end up with what you see above. I have since seen others shorten the mount using a reciprocating saw while still installed to save time. Your call on that one as have not done it myself. I now had plenty of clearance which had gone from 87 mm to 140 mm from the core to the mount! You could also just use TJ steering pump front mount instead and throw the whole fan mount out. For those with LHD's which have the fan on the other side, can simply run from the bottom of the crank pulley directly to the alternator after grinding a little from its bracket. You will need a shorter belt on these at 2050 mm in length compared to the 2480 mm of the stock LHD one. Dino found that a belt from a Mercedes ( 6PK2050 ) fitted perfectly and also made up this LHD fan routing diagram. See also Chucks write up on a LHD with the 16" 3300 CFM fan.

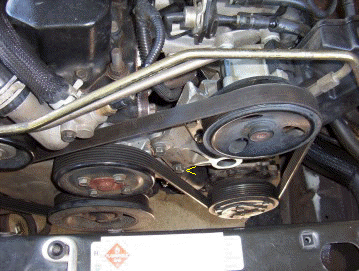
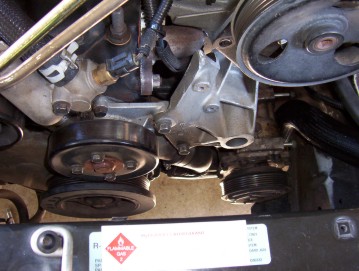
Now next was how to run the belt without the fan bearing in the loop. I looked around at different set ups to determine which components need the most belt wrap to work correctly without slipping. It showed that the air conditioner compressor, crank and water pump pulleys need the most with the alternator the least. Well as TJ's don't run the fan separately from the water pump so this would be the best place to look as well and so this is were the idea for my belt routing comes from. The picture on the left shows the stock run and the right what I ended up with. So now the belt goes straight from the steering pump to the air conditioner compressor and then to the water pump and crank before going back around that to the alternator and on. Everything is still rotating in the same direction as before. What was more remarkable is that I did not even need to change my belt as the stock one I normally run was still fine! I was able to try this routing before even starting this conversion to make sure it would run alright by just bypassing the fan bearing so you might be able to as well if you have a different setup to me. You do need to grind down the bottom bolt a bit to clear the belt running up from the A/C to the water pump ( arrowed ).
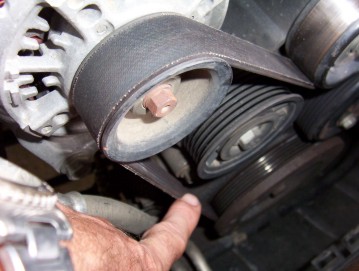
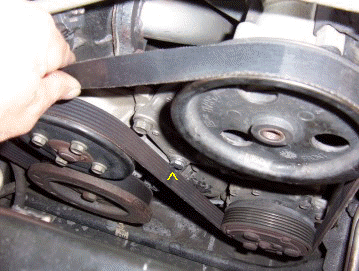
Now a good mate of mine Markus Kramer has since done this conversion on his RHD 1996 XJ which has a slightly different belt run to mine. His has not the automatic belt tensioner but has to use the alternator instead and has an extra idler pulley between the crank and the alternator. He found that running the belt the same as mine and skipping that extra idler pulley under the alternator worked well. You do have to run a longer belt ( Dayco - Poly-rib 6PK2310 ) to stop it touching a bolt on the timing cover which I am pointing to above on this 99 I have done since. Also check up other alternatives I found in this write up since. The longer belt is needed so that the alternator is nearing the end of it's adjustment which allows it to clear that bolt. Check the drawing he has made to explain it better on his RHD ( for LHD's, use the link to the drawing two paragraphs above ). You can also run it the same as stock on the other side and use a Dayco - Poly-rib 6PK2100 belt. The next photo shows how to check you have the right tension afterwards. On the longest run you should be able to just turn the belt 90* as shown. Remember to grind down the arrowed bolt head a bit as well to clear the belt.
Here above is the finished install. with only the wiring left to be done. What I do recommend is fitting some rubber around the sides and bottom of the radiator and under the top support panel. This stops air by passing the radiator and forces in through the core. More detail on this covered here.

These photos above were given to me by John Wood where he followed my suggestion and tried the Perma-Cool 16" fan #19115 which has a higher CFM ( 2950 ) ( he does a lot of heavy towing ) and still a low amp draw. It looks even simpler to install and a very good choice I think. He has been very pleased with the out come.
Now for the wiring. The fan came with a wiring harness so that made things simpler. You must use a relay with the extra fan even though the stock one already has one. They draw a lot of current to start the motor and the stock relay and wire is not up to the job. So the wires on the relay are the usual setup. Pin 30 is power straight from the battery with an inline 30 amp fuse. Pin 85 is run to the body for ground and the fan motor. Pin 86 connects to the power at the stock fan ( green wire on mine ). Pin 87 goes to the fan motor but remember if you have converted from a pusher fan, it will go to the negative wire on the fan. Now the stock 11" fan is controlled by the ECU. It uses the temperature sensor in the thermostat housing to switch on the fan when it reaches 105*C ( 220*F ) and switch it off when it reaches 95*C ( 200*F ). It will also turn on when the air conditioner clutch engages. You can wire in a switch to turn on the fans manually which you can see on my write up on the Taurus fan. IOn my 95 it was a blue with pink stripe wire going into the first relay in the fuse box. Now you have to supply a negative supply to activate the fans to this wire in the 91+ Jeeps and not 12volts.
Now for the impressions. The first thing I noticed was that I could not hear this new fan over the electric stock fan and it sounded quieter overall. The next thing was the first time I pulled up in traffic I thought the engine had stalled as no fans were running so it showed just how much the stock mechanical one made! As far as performance goes I noticed that the engine spun up quicker after a gear change. This was even more noticeable after doing the later model intake change as felt it lost some power up high in the rev range but this conversion just gave a lot of it back! The next thing was that I got 5% better economy on the fuel consumption so along with the 7% I got with the intake change I am 12% better off. As for temperatures I have been driving around in 38*C or 100*F days in traffic for the last 2 weeks since the install and have had no trouble at all even with the air conditioning running flat out. While the air conditioning is running the temperature does not move at all. With it off you see it rise a couple of degrees above normal operating temperature and then the fans switch on and you can see it drop back down straight away. On open road they have not come on at all. It also warms up quicker in the morning which is great as it saves engine wear and fuel because the ECU spends less time in warm up mode where it runs the engine rich. So I am very happy with it and it now has been tested with three weeks of running along beaches and sand dunes in over 100*F temperatures towing my off road camper. One track further inland that was over 100 miles long called Goog's track crossed 300 dunes and with 100*F temps all the way with the trailer on back I never had a problem. Only once in the 6000 km trip did the engine temp rise enough that I waited for it to cool down and that was after 6 hours of running along dunes and beaches in 42*C temps or 108*F where I had the aircon on all the time. There was a stretch of beach that no one else had run and suddenly it became very soft. I was still in high range and didn't want to stop as was not sure I could re-start. I forgot to keep an eye on the temperature and still had the aircon on and after 20 minutes I noticed it started to get near the red. I stopped and shut down the motor and then the pressure rose and the water started to pump out. I should have left it running as learnt form the book mentioned that so long as you are not loosing water you are not at risk of doing engine damage. After fifteen minutes it a had dropped right back down and in low range and the aircon off the next 30 minutes back to camp on the same beach was fine.
[Index]